|
Humans have been using light and sound
to achieve altered states of consciousness for thousands
of years. Primitive cultures used flickering fires and
rythmic drumming to induce these altered states. Today,
you can choose from a wide variety of electronic
brain-wave machines which use light and/or sound to
alter brain-wave activity. Brain-wave activity ranges
from fully awake to deep dreamless sleep. This activity
is categorized into five primary groups: Delta, Theta,
Alpha, Beta, and Gamma.
|
Delta |
0.1 - 3 Hz |
deep sleep,
lucid dreaming, increased immune functions,
hypnosis |
|
Theta |
3 - 8 Hz |
deep relaxation,
meditation, increased memory, focus,
creativity, lucid dreaming, hypnagogic state |
|
Alpha |
8 - 12 Hz |
light
relaxation, "super learning", positive
thinking |
|
Low Beta |
12 - 15 Hz |
relaxed focus,
improved attentive abilities |
|
Midrange Beta |
15 - 18 Hz |
increase mental
ability, focus, alertness, IQ |
|
High Beta |
above 18 Hz |
fully awake,
normal state of alertness, stress and
anxiety |
|
Gamma |
40 Hz |
associated with
information-rich task processing and
high-level information processing |
By using light and sound to induce these
brain states we are able to gain greater control and
efficiency of brain usage. Furthermore, improvements in
relaxation, memory, creativity, stress management, sleep
disorders, and even ESP(!) can be had by utilizing a
brain-wave machine.
Commercial brain-wave machines cost
hundreds of dollars, but you can build your own using
only a few dollars worth of components. In this document
I will walk you through hardware construction and
software control of an easy to build brain-wave machine.
Disclaimer: I am not an electronics
expert or a biofeedback specialist. If you fry your
hardware (or your wetware) don't come whining (or
drooling) to me. I assume no responsibility for what you
do with this information.
With simplicity being the goal,
brain-wave goggles can be constructed from suitable
eyewear, such as safety glasses, and an array of LED's
(Light Emitting Diodes). I'm using the PC's parallel
port to control the flashrate of the LED's. Audio
stimulation can be provided by a stereo and headphones
or the PC's soundcard.
I'm using 8 LED's, one per parallel port
data out line. This provides an easy way to control each
individual LED allowing for some variations in pattern
and intensity. Each lense on the goggles will hold four
LED's in a diamond pattern. The LED's are powered by the
parallel port and controlled via software.
Basic electronics experience is
recommended but not necessary to construct this
brain-wave machine.
8 LED's (choose green, yellow, or red
LED's)
DB25 pin male parallel port connector (or butcher a
printer cable)
Goggles (safety glasses or similar eyewear)
Wire
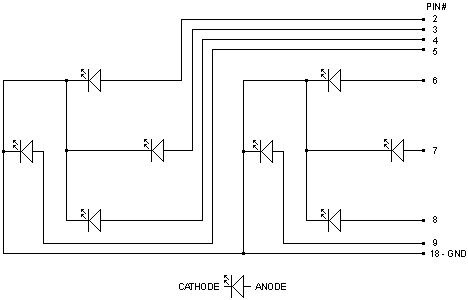
Circuit Diagram
-
Drill four holes in each lense in a
diamond pattern as shown in the diagram to the right.
Make the holes just large enough for the LED's to fit
through.
-
Glue the LED's into the holes. Be sure
there is room between the LED's and your face when you
are wearing the goggles. Actually, the LED's fit tightly
in 3/16" holes and I didn't need to use glue.
-
Wire all of the LED's cathode leads
together and connect (with a long wire) to a ground pin
on the parallel port connector. Pins 18-25 are all
ground so pick any one of those. Note: the flat side of
the LED is the cathode lead.
-
Connect the LED's anode leads to the
parallel port connector. Follow the circuit diagram
above which outlines which parallel port pin to connect
each LED to. Use long wires, you are going to want to be
lying down when you use the goggles. (If you are using a
printer cable you can use a battery and a LED to figure
out which pin each wire is attached to.)
-
If your parallel port wires aren't
already in a bundle tie them together with wire-ties so
they don't get tangled. You will also want to provide
strain-relief by attaching the wire bundle to the
goggles so it doesn't get pulled off.
|
