|
So you've read about my Computerized
Room or have seen those nifty home automation products
advertised in the back of electronics magazines? Or
perhaps someone you know has done something similar. At
any rate, you have decided to try it yourself. The first
thing I will say, however is that it is not cheap.
You will first need a computer, but
since your reading this, I assume that you already have
that taken care of. Second, you will have to buy about
20 IC's and a very expensive ISA experimenters
prototyping board. These boards cost anywhere from $16
to $45, and can be purchased from your local electronics
store or from Jameco Electronics (See Where To Get
Parts). They have a fairly wide selection. Buy the 8 bit
version, the 16 bit varsion is not needed for this
project.
Since this is a major project, it will
be presented in sections, starting with the Simple
Parallel Port Interface. The 8 Bit Output Card will come
next, followed by the 8 Bit Input Card. All three
interfaces came from the book "The Robot Builders
Bonanza", by Gordan McComb.
I must also stress that this is a major
project and should not be attempted unlesss you have a
good understanding of electronics. If done wrong, you
run the risk of not only destroying the circuit, by also
destroying an expensive computer as well. Double, no,
triple check your work to make absolutely sure that is
free from errors before installing it in any computer.
DISCLAIMER: I am not responsible
for any damages caused due to a lack of knowledge or
mistakes in the circuit when building and using these
projects.
Now then, with that out of the way, on
to the Parallel Port Interface.
Parallel Port Interface
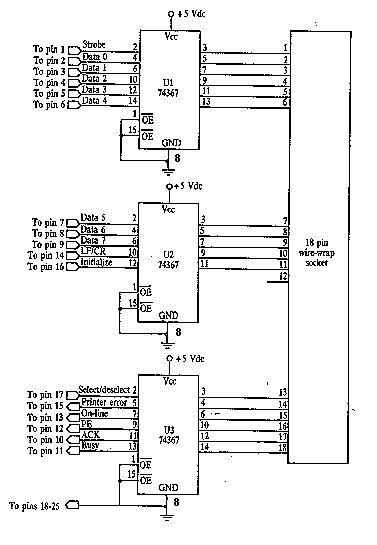
This is about the most basic interface
you will see. It uses only 3 74376's (74LS367). This
interface provides 8 outputs (plus 3 address lines) and
5 inputs. This is usually enough for one room, providing
you make use of some demultiplexers and the address
lines. You could have up to 128 output lines using the
address lines, a 74LS138 and 8 74LS154's.
Begin construction by mounting the IC
sockets on the board. I used a experimenters universal
solder board due to the large number of wires that must
cross. If a PC board were used, you would need either a
multi-layer board or many, many jumpers.
Now, solder wires along the top and
bottom of the board, making all the connections between
the IC sockets. Do not install the IC's yet. Assemble
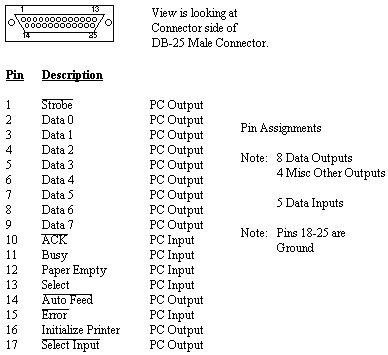
the cable using 26 conductor ribbon cable and a 25 pin
crimp connector. You will have one conductor left over
so just "peel" it off. Connect the cable to the board
and wire it into the circuit. I used an 18 pin socket to
make connections to the outputs and inputs on the
interface easy. You could do the same if you like, or
use a terminal strip.


|
Part |
Total Qty.
|
Description
|
Substitutions
|
| U1,U2,U3 |
3 |
74LS367. Buffer |
7437, 74HC37 |
| MISC |
1 |
Sockets, 18 Pin Socket (For Output), Board, Ribbon Cable, 25 Pin Connector |
|
You operate the interface by sending bit
patterns to the printer port. BASIC, GWBASIC or QBasic
are the languages of choice since most computers already
have them installed (in your DOS directory). If you
wish, you can download control software from my files
section.
The command you use is the OUT command.
The decimal address of most printer ports (assuming
LPT1) is 888. Use this with the OUT like this:
OUT 888,X
X is a number from 0 to 255 that
represents the binary bit pattern.
Although designed primarily to get data
out of the computer, the printer port has 5 input lines
(on some computers it could be less). You access these
lines with the INP function. This time, however, the
decimal address is 889. The syntax of the INP command
is:
Y=INP(X)
Y is the variable used to store the
decimal value that is returned. X is the port number,
which in this case is 889.
You may also use the OUT command to send
data to the address lines. Just use address 890 instead
of 888. Remember that there are only 4 address lines.
8 Bit Output Card
OK. With the basic parallel port
interface done, you can build the more advanced 8 Bit
Output Card.
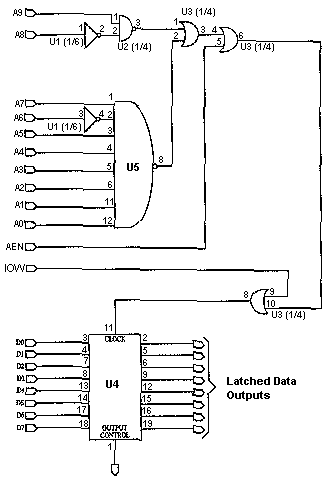
This is much more complicated then the
parallel port interface, mostly because of the address
lines used by the computer to send data to different
devices plugged into it's bus.
This interface is constructed on an IBM
8 bit prototyping board. These are available from Jameco
Electronics (see Where To Get Parts).Connections are
made with point to point soldering or wire wrap. Note
that if you use the wire wrap method the board will
require about 1/2 inch clearence on the connection side.
Use sockets for all IC's. Begin
construction by first mounting the sockets. Depending on
which board you buy, you might have lots or very little
space. Connect the IC's together using either point to
point or wire wrap. I used a 36 pin connector to
facilitate connection to the back of the computer, but
you can use any other method. Whatever the method,
install that connector and wire it into the circuit now.
You may now wire the connections to the bus (the gold
contacts on the bottom of the card). If you need a
reference as to what the bus connections are, check out
The IBM Bus Pinout (I apologize for the poor image
quality). It is a good idea to bypass power supply pins
with .1uf capacitors to avoid problems with
interference, power supply spikes, etc. Triple check
your work before installing the circuit in any computer.
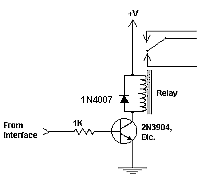
The simple circuit to connect the interface to relay's
is showen after the schematic.

|
Part |
Total Qty.
|
Description
|
Substitutions
|
| U1 |
1 |
74LS04 Inverter |
7404, 74HC04 |
| U2 |
1 |
74LS00 NAND Gate |
7400, 74HC00 |
| U3 |
1 |
74LS32 OR Gate |
7432, 74HC32 |
| U4 |
1 |
74LS374 Buffer |
74374, 74HC374 |
| U5 |
1 |
74LS30 8 Input NAND Gate |
7430, 74HC30 |
| MISC |
1 |
8 Bit IBM Prototyping Board, Connector (For
Output/Input), Sockets, Capacitors For IC
Bypass, Wire. |
|
The power connections were left off the schematic for
clarity. Here they are:
|
Chip |
Vcc |
GND |
| 7400 |
14 |
7 |
| 7404 |
14 |
7 |
| 7430 |
14 |
7 |
| 7432 |
14 |
7 |
| 74374 |
20 |
10 |

Controlling the cards is straight
forward, using the basic INP and OUT statements as
explained in the Simple Parallel Port Interface. The
only difference is the address. The address for the
input card is decimal 701 while the output card is
decimal 703.
This is the last section of this
document. Choosing the right computer is not that big of
a concern. Anything from an old 8086 to IBM's new Deep
Blue supercomputer will work. Just make sure that you
triple check your work before installing it into any
computer
|